News Center
- Commercial Air conditioning compressor replacement reference
- date: 2020-04-21 hits:1107
- Commercial Air conditioning compressor replacement reference
step 1: Cut off the power supply, confirm the compressor damage needs to be replaced, first disconnect the outdoor machine power supply switch, disconnect the power supply wiring, disconnect the outdoor unit from the power supply and seal it with an insulating tape.

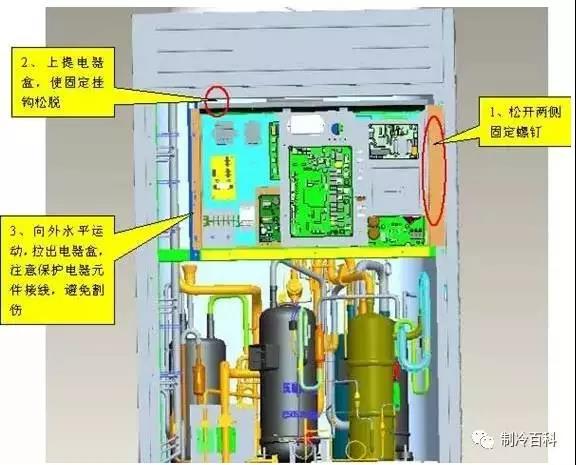
step 2: Clean the electrical box components. When removing the compressor wiring, the temperature sensor and the electric heating, the corresponding marks should be made to facilitate the rewiring after replacement.
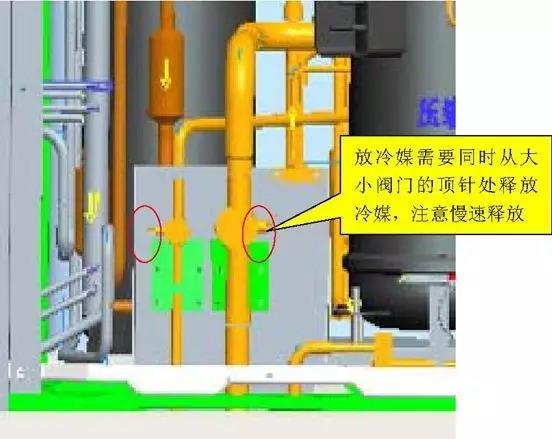
step 3: Release the refrigerant, the refrigerant of the system, should be released from both the high and low pressure sides of the system. If the air is released from only one side, the scroll seal will result in incomplete refrigerant release. Do not release the refrigerant too quickly, or a large amount of lubricant will be taken out of the system together with the refrigerant.
step 4: When the compressor is replaced and the compressor is dismantled to confirm the oil quality, if the oil quality is clear and no impurities are found, the oil quality in the system can be considered not contaminated, while ensuring that the unit valves and oil circuits are not abnormal, you can just replace the compressor.
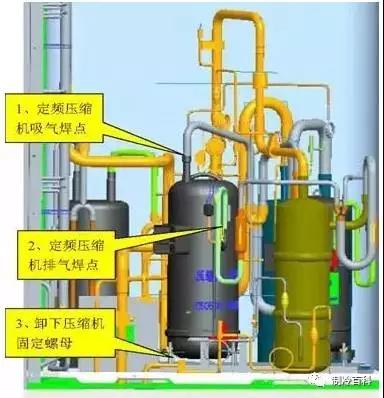
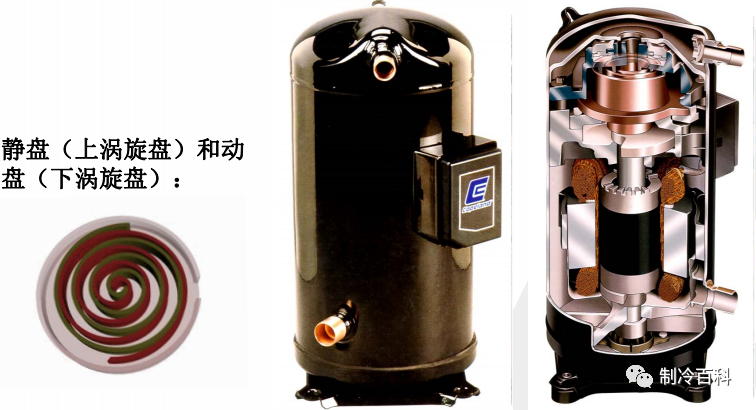
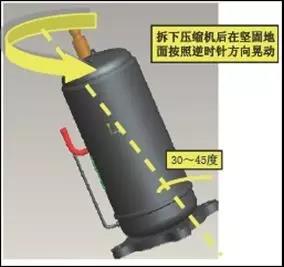
1.Remove the compressor, the compressor in the solid ground shaking, shaking angle should be between 30 ~ 45 degrees (left) , to ensure that the deposition in the bottom of the compressor can be poured out.
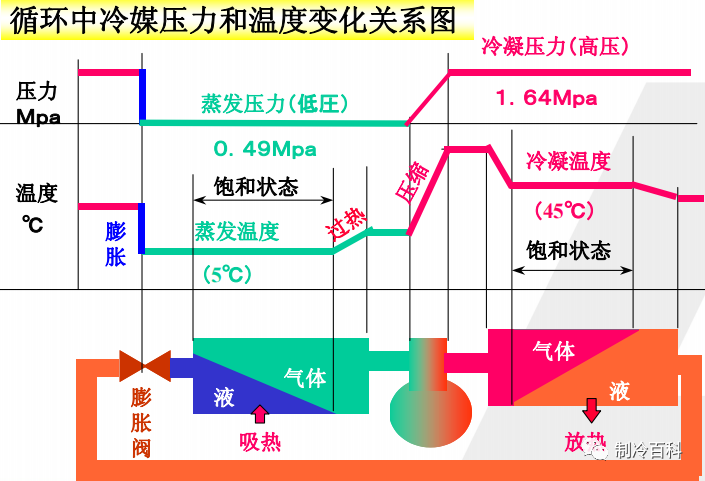
2.Place the compressor above the level of the ground. Pour oil from the compressor outlet. Use a beverage bottle or other transparent container to store the oil. The amount of oil collected should be greater than 150 ml. Note that the compressor axial position and horizontal angle should not exceed 20 degrees.\
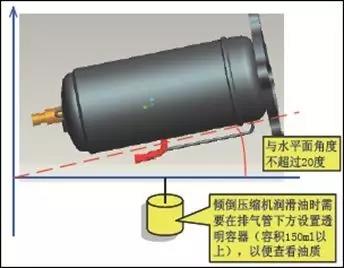
3.Put the collected compressor oil in a bright place to see if it contains impurities and discoloration. Also note the smell of the compressor oil. The normal oil has no obvious pungent smell.
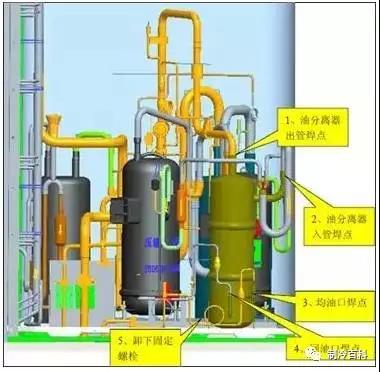
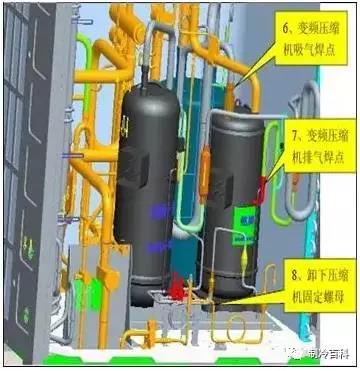
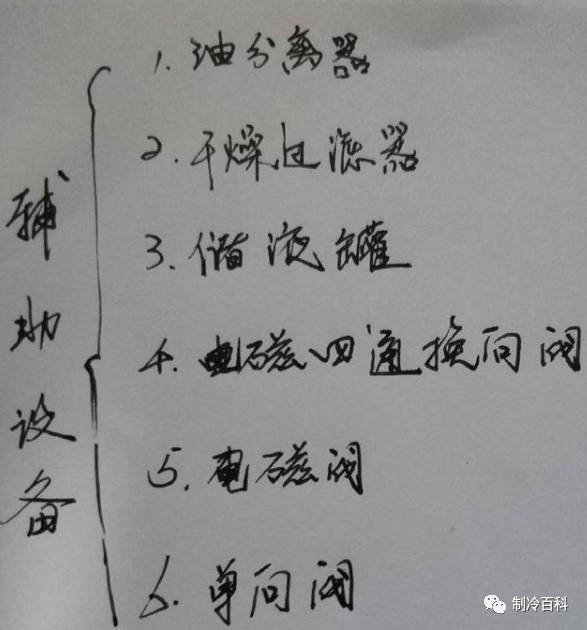
step 5: Confirm the system components, system oil pollution, you need to confirm the unit's components, including the oil separator, gas-liquid separator and storage tank.
1.(oil separation, below) , confirm that there are no impurities, etc. .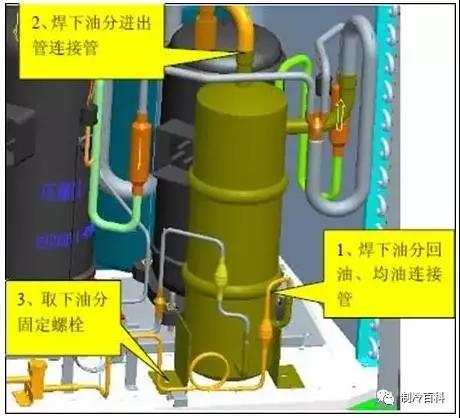
2, gas-liquid separator (below) , check whether there are impurities and other substances.
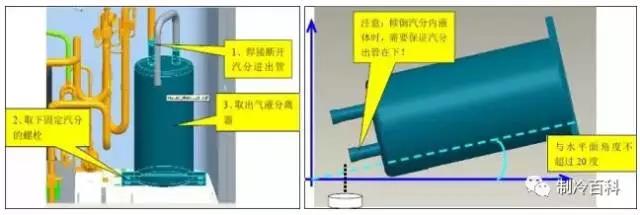
Note: If the compressor damage needs to be replaced, must also replace the gas-liquid separator! Whether or not the gas-liquid separator contains impurities or other abnormal conditions.
3. Remove the tank (below) to confirm that it does not contain any impurities.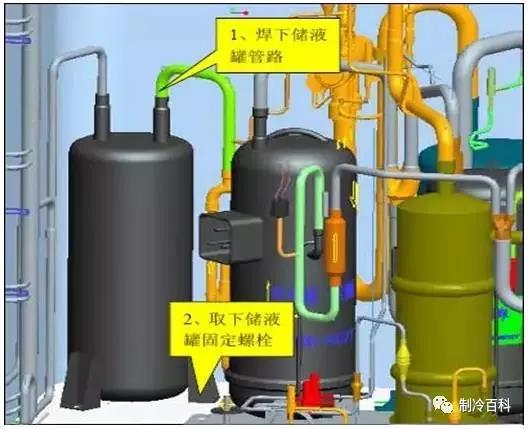
Note: to collect the oil, gas, liquid tank poured out of the compressor oil, and make a good record, to facilitate the replacement of compressor, gas, and other components, the system to add lubricating oil.
Step 6: After cleaning the system and identifying the parts that need to be replaced, make sure that there is no abnormality in the system piping, use nitrogen to blow-wash the main piping, and focus on testing and cleaning the oil piping system.
1.Clean all oil pipeline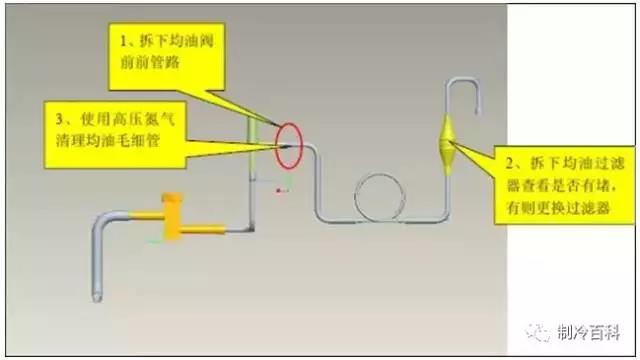
2, CLEAN RETURN OIL PIPELINE
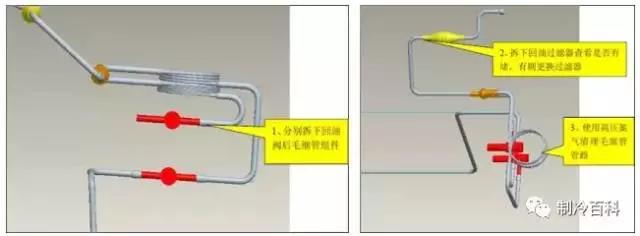
step 7: Check before replacement, check whether the model of the compressor is consistent.
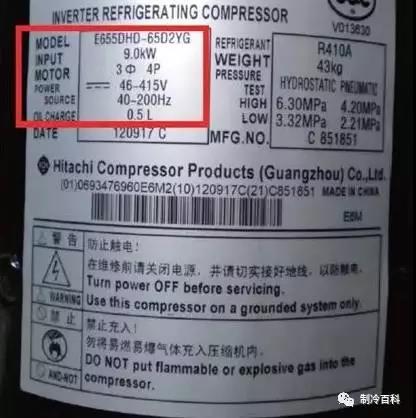
when handling a new compressor, it is necessary to note that the compressor can not be flat or upside down, the angle of tilt should be kept within 30, also pay attention not to let the compressor from the oil balance point of the oil flow.

make sure the sealing rubber blocks of the compressor, oil, steam, oil distributor and drying filter are in good condition.

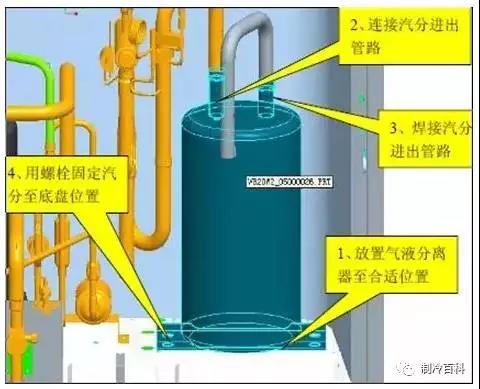
step 8: replace the gas-liquid separator, place the steam separator in a suitable position with the chassis, connect the steam inlet and outlet pipe, and then connect the nitrogen joint on the steam connection pipe. The position of the nitrogen joint can be selected according to the site conditions, can Use by-pass interface or directly connected in the steam into the pipeline, the pipeline can be used with a larger connection with tape, need to ensure that nitrogen can flow through the steam smoothly.
step 9: replace the liquid tank. If the tank is removed after inspection, no foreign matter and impurities can be removed. Because the tank structure is only equivalent to a container tank, does not involve complex structure, and generally does not need to be replaced, however, if there are impurities and foreign matter, it must be replaced, because the tank can not clean up the internal contamination.
Step 10: change the compressor
1, if only the replacement of constant frequency compressor
2, need to change the frequency of compressor
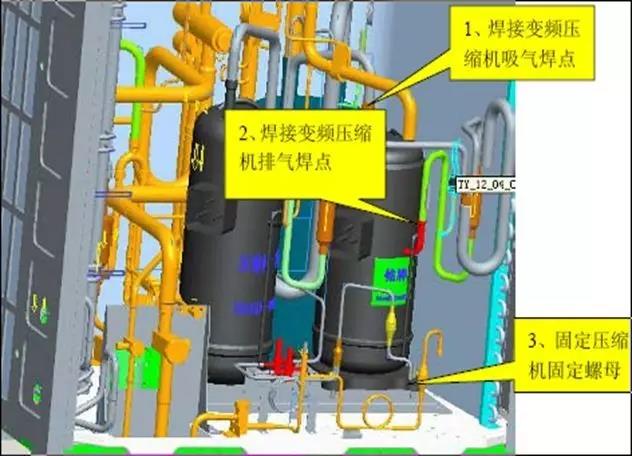
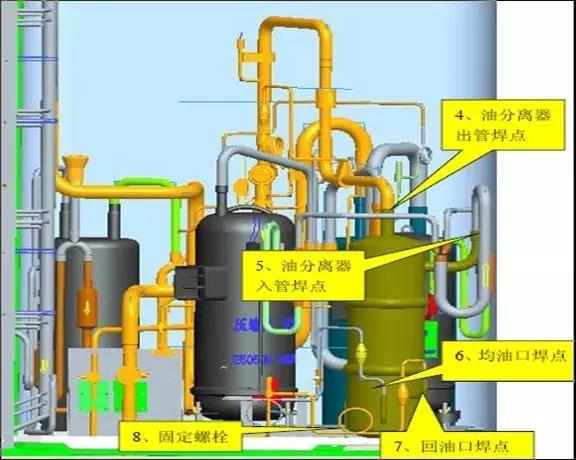
replacement of the compressor need to pay attention to the specific matters:
1, if the compressor suction and exhaust port is copper-plated steel pipe, a solder containing at least 5% silver is required. Welding gap should be 0.1 ~ 0.3 mm, to prevent welding blockage or false welding. Do not overheat the nozzle during welding.
2.After welding the pipeline system, it is necessary to fix the compressor with pads and bolts to ensure the stability of the compressor.
3, the compressor wiring phase sequence error or frequency conversion and fixed frequency mixing of the situation.
Step 11: change the oil separator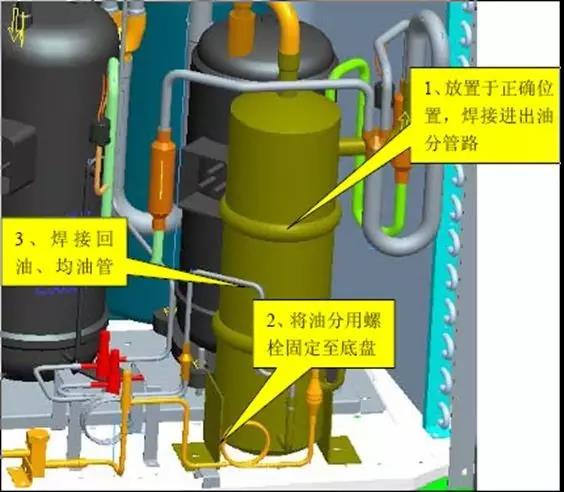
step 12: System leak detection
1, first for each solder joint inspection, first observe whether the solder joint is smooth and there is no obvious welding hole and other abnormal conditions;
2, for the Unit System Nitrogen pressure, make the system pressure above 25kgf, close the unit size valve, ensure the pressure inside and outside the machine at the same time above 12h, if the pressure does not change, you can start to vacuum, otherwise to re-leak detection until leak detection.
Step 13: Add Refrigeration Oil
1, connect the unit size valve, vacuum more than 30 minutes. Connect the low pressure measuring valve with a rubber tube, open the container where the oil is stored, and pour the oil into the measuring cup to measure the appropriate additional amount. After adding proper lubricant, close the low pressure measuring valve to ensure the seal.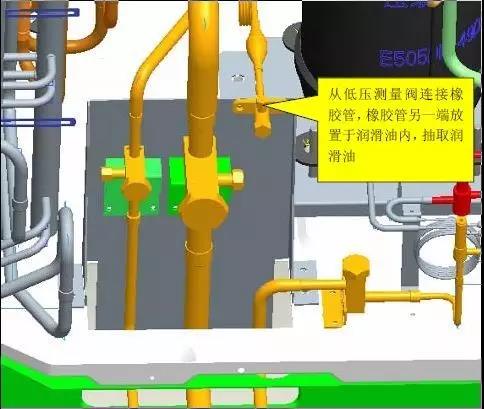
Note: The refrigerant oil of the compressor plays a very important role in the normal operation of the compressor. It must be filled with the correct grade and quality lubricating oil according to the requirements of the equipment.
Step 15: Filling Refrigerant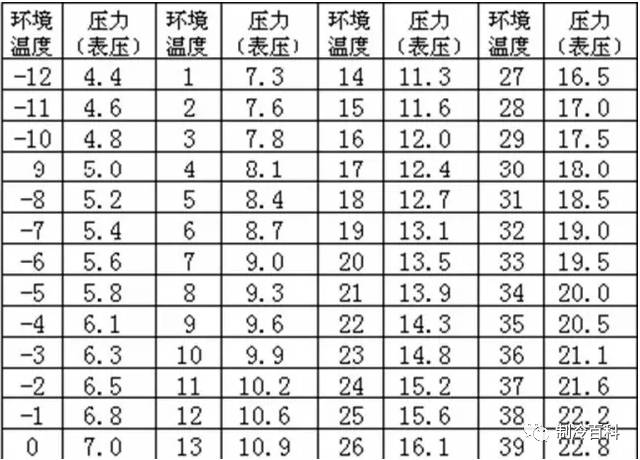
additional refrigerant charge calculated according to the Nameplate Rating Plus Piping; if the unit is a multi-module connection installation, only the refrigerant of the unit outside the unit is released before maintenance, after pouring 80% of the rated pouring amount of the nameplate of the external machine, the adjustment is made through the starting and debugging parameters.
Step 16: Connect the electrical components, install the electrical box, connect the compressor cable and the corresponding electrical heating tape according to the previous mark and the circuit diagram behind the electrical box cover. Note: must be carefully checked according to electrical wiring diagram, must ensure that the wiring is correct!
Step 17: start-up Commissioning, Unit start-up commissioning, respectively running refrigeration full-open, refrigeration single-open, heating full-open and heating single-open unit operating conditions, each operating condition requires operation of more than 30 minutes, and data analysis, adjustment of the unit system, make sure all the parameters are in order.
Article Collation from the "encyclopedia of refrigeration" cold and warm life, Binger accompanied -
pre:What is supercooling and super
next:Air Conditioning maintenance d - back


